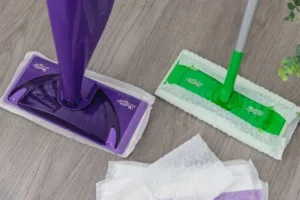
Mopping can feel like a chore. You haul a bucket, wring out a heavy mop and then wait for the floor to dry. The Swiffer WetJet changes that routine with a spray mop that cleans in minutes.
If you just bought one, you may wonder how do you use the Swiffer WetJet the right way. This guide walks you through every step in plain language. You will also learn which floors are safe, how to avoid streaks and how to save money on refills.
What Is the Swiffer WetJet?
The Swiffer WetJet is a spray mop made by Procter & Gamble. It holds a bottle of cleaning solution and sprays it onto your floor as you push. A disposable pad then picks up dirt, dust and sticky spots.
You do not need a bucket or water from the tap. The mop is light, so you can carry it from room to room with one hand. Most people finish a small kitchen in under five minutes.
What Comes in the Starter Kit
A starter kit has everything you need to begin. The exact parts can change by model, so check your box. Here is what you will usually find:
| Part | What It Does |
|---|---|
| Mop handle | Gives you a long grip so you can clean without bending |
| Mop head | Holds the pad and sprays the solution |
| Cleaning solution bottle | Stores the liquid that loosens dirt |
| Mopping pads | Scrub and trap dirt as you push |
| Batteries | Power the spray trigger on powered models |
How Do You Use the Swiffer WetJet – Step-by-Step
Now let us get to the main question. How do you use the Swiffer WetJet from the moment you open the box? Follow the steps below in order. The whole setup takes about five minutes.
Step 1: Assemble the Mop
Start by clicking the handle pieces together. Slide each section into the next until you hear a firm click. Then connect the handle to the mop head.
Give the handle a gentle tug to test it. A loose handle can wobble and slow you down. Press the pieces together again if you feel any play.
Step 2: Add the Batteries
Many WetJet models use batteries to power the spray. Open the battery cover on the handle. Insert the batteries and match the plus and minus signs.
Close the cover until it snaps shut. Check your manual for the right battery type and count. Always use fresh batteries so the spray stays strong.
Step 3: Attach the Cleaning Solution Bottle
Next, take the bottle and remove its cap. Push the bottle into the slot on the mop until it locks. Most bottles fit with a quick twist or a firm press.
Look for a small click. That sound tells you the bottle sits correctly. A bottle that is not seated well can leak or fail to spray.
Step 4: Attach a Mopping Pad
Lay a pad flat on the floor with the soft side up. Place the mop head on top of the pad. Press the small holders on the head into the slots on the pad.
Make sure the pad sits flat and tight. A loose pad can slip off while you clean. Tuck in any edges that stick out.
Step 5: Sweep or Vacuum First
Before you spray, clear away loose dirt. Sweep with a broom or run a vacuum over the floor. This step keeps grit from scratching your floor.
Skipping this step can leave dirty streaks. It also makes your pad fill up faster. A quick sweep saves you money in the long run.
Step 6: Press the Trigger and Start Mopping
Now the fun part begins. Press the trigger on the handle to spray the floor in front of you. Then push the mop forward in a smooth line.
Work in small sections of about four feet at a time. Move in an S-shaped pattern so you cover every spot. Spray again when the floor in front of you looks dry.
Step 7: Scrub Tough Spots
Some messes need extra effort. Spray the sticky spot, then rub the mop back and forth over it. Many pads have a scrubbing strip that lifts dried food and grime.
Let the solution sit for a few seconds on stubborn spots. This short wait helps it break down the mess. Then scrub again until the spot comes clean.
Step 8: Change the Pad When It Gets Dirty
A pad can only hold so much dirt. Peel off the old pad when you see it turn gray or feel it drag. Press on a fresh pad and keep going.
One pad often cleans one or two rooms. Large or very dirty floors may need more. Swapping pads on time gives you a better shine.
Quick Reference: Swiffer WetJet Steps at a Glance
| Step | Action | Time Needed |
|---|---|---|
| 1 | Assemble the handle and head | 1 minute |
| 2 | Insert batteries | 1 minute |
| 3 | Lock in the solution bottle | 30 seconds |
| 4 | Attach a pad | 30 seconds |
| 5 | Sweep the floor | 2–5 minutes |
| 6 | Spray and mop | 5–10 minutes |
| 7 | Replace the pad as needed | 30 seconds |
Which Floors Can You Clean With a Swiffer WetJet?
The WetJet works on many hard floors. Procter & Gamble lists several sealed surfaces as safe. Always check the label on your product before you start.
Here are the floor types that usually work well:
- Sealed hardwood
- Ceramic and porcelain tile
- Vinyl and linoleum
- Laminate (use light spray and dry it quickly)
- Sealed stone
Floors You Should Avoid
Some floors do not handle liquid well. Water can soak in and cause damage. Skip the WetJet on these surfaces:
- Unsealed or unfinished wood
- Waxed floors
- Unsealed stone
- Rugs and carpet
Test a small hidden spot if you feel unsure. Wait a few minutes and look for dull patches or stains. If the spot looks fine, you can go ahead.
Tips for Better Results
You now know the basics. A few small habits can make your floors look even better. These tips come from common user advice and the product guidelines.
First, use light pressure. Pressing too hard does not clean faster. It can tire your arm and leave streaks.
Second, mop toward the exit. Start at the far corner of the room and back out toward the door. This way you never step on a wet floor.
Third, do not oversoak the floor. Too much spray leaves puddles and slows drying. Use short bursts and let the pad do the work.
Fourth, open a window or turn on a fan. Fresh air helps the floor dry faster. A dry floor also lowers the risk of slips.
How to Care for Your Swiffer WetJet
A little care helps your mop last longer. Take out the batteries if you will not use the mop for a few months. Old batteries can leak and damage the handle.
Store the mop upright in a closet or corner. Keep the bottle in a cool, dry place. Heat can harm the solution and the plastic.
Wipe the mop head with a damp cloth now and then. This removes dust and sticky buildup. A clean head sprays better and lasts longer.
Common Problems and Easy Fixes
Even a good mop can act up at times. Most issues have simple fixes. Use the table below to solve them fast.
| Problem | Likely Cause | Easy Fix |
|---|---|---|
| The mop will not spray | Weak or missing batteries | Put in fresh batteries |
| The mop will not spray | Bottle not locked in | Remove and re-seat the bottle |
| The floor looks streaky | Pad is too dirty | Replace the pad |
| The pad slips off | Pad not seated on holders | Press the pad onto the holders again |
| The mop leaks | Bottle cap or seal is loose | Tighten the bottle and check the seal |
Is the Swiffer WetJet Worth It?
Many busy households say yes. The mop saves time and setup is easy. You also skip the mess of dirty mop water.
There is a cost, though. You must buy pads and solution refills over time. Compare the price per use with a regular mop and bucket to see which fits your budget.
Think about your home, too. A small apartment with tile or vinyl suits the WetJet well. A large house with many rooms may need extra pads each week.
Conclusion
Learning how do you use the Swiffer WetJet takes only a few minutes. Assemble the mop, add batteries, lock in the bottle and attach a pad. Then sweep, spray and mop in an S-shaped pattern.
Remember to check that your floor type is safe. Change the pad when it gets dirty. With these habits, you will keep your floors fresh with little effort.
Now you know how do you use the Swiffer WetJet safely and well. Try it on one room today. You may never go back to the bucket again.
Frequently Asked Questions
How do you use the Swiffer WetJet for the first time?
Assemble the handle and head, then add batteries. Lock in the solution bottle and attach a pad. Sweep the floor, press the trigger and start mopping.
How do you use the Swiffer WetJet on hardwood floors?
Make sure the wood is sealed first. Spray lightly and mop with the grain. Dry any wet spots quickly so water does not soak in.
How often should you change the pad?
Change the pad when it looks gray or stops picking up dirt. One pad often covers one or two rooms. Very dirty floors may need a new pad sooner.
Do you need to sweep before using the WetJet?
Yes, you should. Loose dirt and hair can clog the pad. A quick sweep gives you a cleaner floor and a longer-lasting pad.
Can you refill the Swiffer WetJet bottle?
The maker sells official refill bottles for the mop. Procter & Gamble does not recommend adding your own mix. Homemade solutions may harm the sprayer or your floor.
Why is my Swiffer WetJet not spraying?
Weak batteries are the most common cause. Try fresh ones first. Then check that the bottle sits tight and the nozzle is clear.
Is the Swiffer WetJet safe for pets and kids?
Let the floor dry before pets and children walk on it. Keep the solution bottle out of reach. Read the label for full safety details.